 We’ve seen badges and gamificiation appear in everything from a core business plan (Foursquare & Gowalla) to navigation apps (Waze). I’ve seen them on a user homepage at least two companies. It helps get people engaged by bringing together groups of common interest and drive involvement in tasks that they might not otherwise be involved in. You look up a colleagues and find they’ve done something similar to you.
The problem with the virtual badges is that they are too cheap to make (effectively free to create a new one) and only appear when you go to the employee’s homepage. Having played with 3d printing, I realized that you could make these badges in real life and bring a bit of physical interest to the work place, applying the same rules. With a few minutes on an online 3d modeling tool, online 3d printing services, and finally a magnet and some super glue, you can easily end up with full color sandstone badge.
3D Modeling
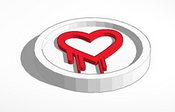 Modeling online with 123D Design or TinkerCad make creating simple geometry defined objects ridiculously easy. To create the heartbleed badge shown above, it comes down to 3 objects: a cylinder, a subtractive cylinder hole, and this heartbleed svg which tinkercad can import as an extruded shape. Literally after five minutes in tinkercad we have the 3d model shown on the right.
Since SVG files can be tweaked via applications such as Inkscape or in a text editor, you can easily pull apart a SVG into multiple parts to extrude each part individually to end up with multi-color badges. More advanced modeling tools would allow you to apply images, textures and gradients, but that is beyond my time investment right now. The current state of gamification badges are usually bold solid colors so it makes this method work really well.
The general dimensions I ended up with was 30 mm diameter, 3mm high, 1 mm tray for the design.
3D Printing
Now that we have our 3D model, Shapeways.com offers full color sandstone for printing. It is inexpensive at $0.75 per cubic cm. with a handling charge of $3.00. The model above is about 2 cubic cm. That makes it about $1.50 per badge. Lead time for printing is about 5-10 days.
The sandstone printing is quite accurate, with a minimal feature detail of 0.4 mm and 2mm walls. This allows for some highly detailed designs.
The image at the top is the “Heartbleed” badge for those in my team that were involved in the triage and resolution of the day the internet broke.
Production Thoughts
 Since the online sandstone printing has a handling charge but does not restrict the number of parts, it is economical to print multiple at the same time. To achieve this I used a 7 x 7 grid of badges. I have included a picture of the layout to the left. In theory, this can be layered multiple times make prints of 150 or 250 individual badges. I would expect that Shapeways might ultimately take issue with that sort of volume for the $3.00 handling fee.
The Result
 After a couple of rejections by shapeways for areas that were too thin, and 6 days in manufacturing, 2 days shipping- they arrived. The picture to the right shows what arrived. For reference, the medals represent (left to right, front to back):
- Flag of Monaco – A Software Release called “Monaco”
- Shield – For a partner product
- Heartbleed
- “Long Beach Highway” California Highway 710 – A Software Release
- Test Automation
- Test Improvement
A Little Bit More Polish and Magnetism
Looking closely at the badges as shipped, the colors were somewhat muted and had a light powder coating over them. This was resolved by spraying a clear acrylic overcoat. Playing with different repeated passes of the overcoat ultimately led me to believe that a single coat would be sufficient, smoothing out the colors. Extra coats didn’t really help, only resulting in pooling of the overcoat in the corners of the badges.
To make the badges usable, I also took a small 1/4 by 1/16 rare earth magnets and glued them to the back of the badge. Now they are either fridge magnets or they can be attached to any ferrous material now.
A word of warning… Wait until the overcoat is dry before touching. It stays wet for about an hour. Also be careful of keeping the magnets close to each other before the glue dries. They can jump about 4 inches unexpectedly.
Gamifying the Office
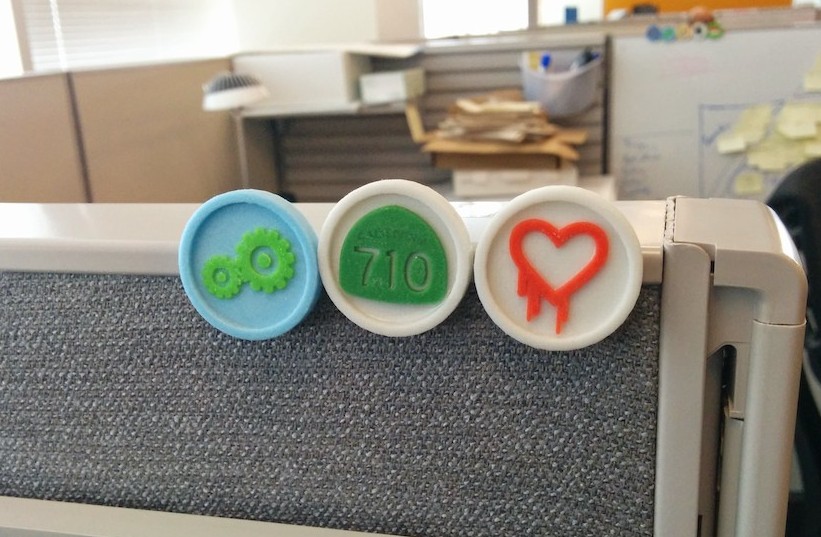 Now that the badges are sealed, clean and magnetized, time to badge the office. With the rare earth magnets, they will stick to almost any ferrous surface. At work there is a thin strip of metal at the top of the cubicle wall. To the left is a picture of the first three up at my cubicle. The interest in more of these has been pretty high – the second batch will probably go out within a week of the first batch arriving.
If you are interested in articles on Management, Software Engineering or any other topic of interest, you can contact Matthew at tippettm_@_gmail.com via email, @tippettm on twitter, Matthew Tippett on LinkedIn, +MatthewTippettGplus on Google+ or this blog at https://use-cases.org/.
